Flutter Chat Screen

最近一直在学习和关注Flutter技术,觉得这应该是未来移动端的一个趋势所以学习动力很足。Flutter现在还不是很成熟,包括UI设计方面,所以今天我就来总结一下开发中遇到的问题及相关解决方法。
前言
最近在做一个项目,其中需要有聊天信息界面,就相当于微信聊天界面,当然没有那么复杂了,其实是我暂时也做不出那么复杂的界面。只需要发发文字就行了,就像是短信这种。所以就去github上找开源项目,不过说来也巧,Google自己做了一些相关的例子所以我就选取了一个friendlychat-steps。
分析
首先就是去看看friendlycat的运行结果如何,如下图所示是官方给出的andorid 和 ios的运行效果图。
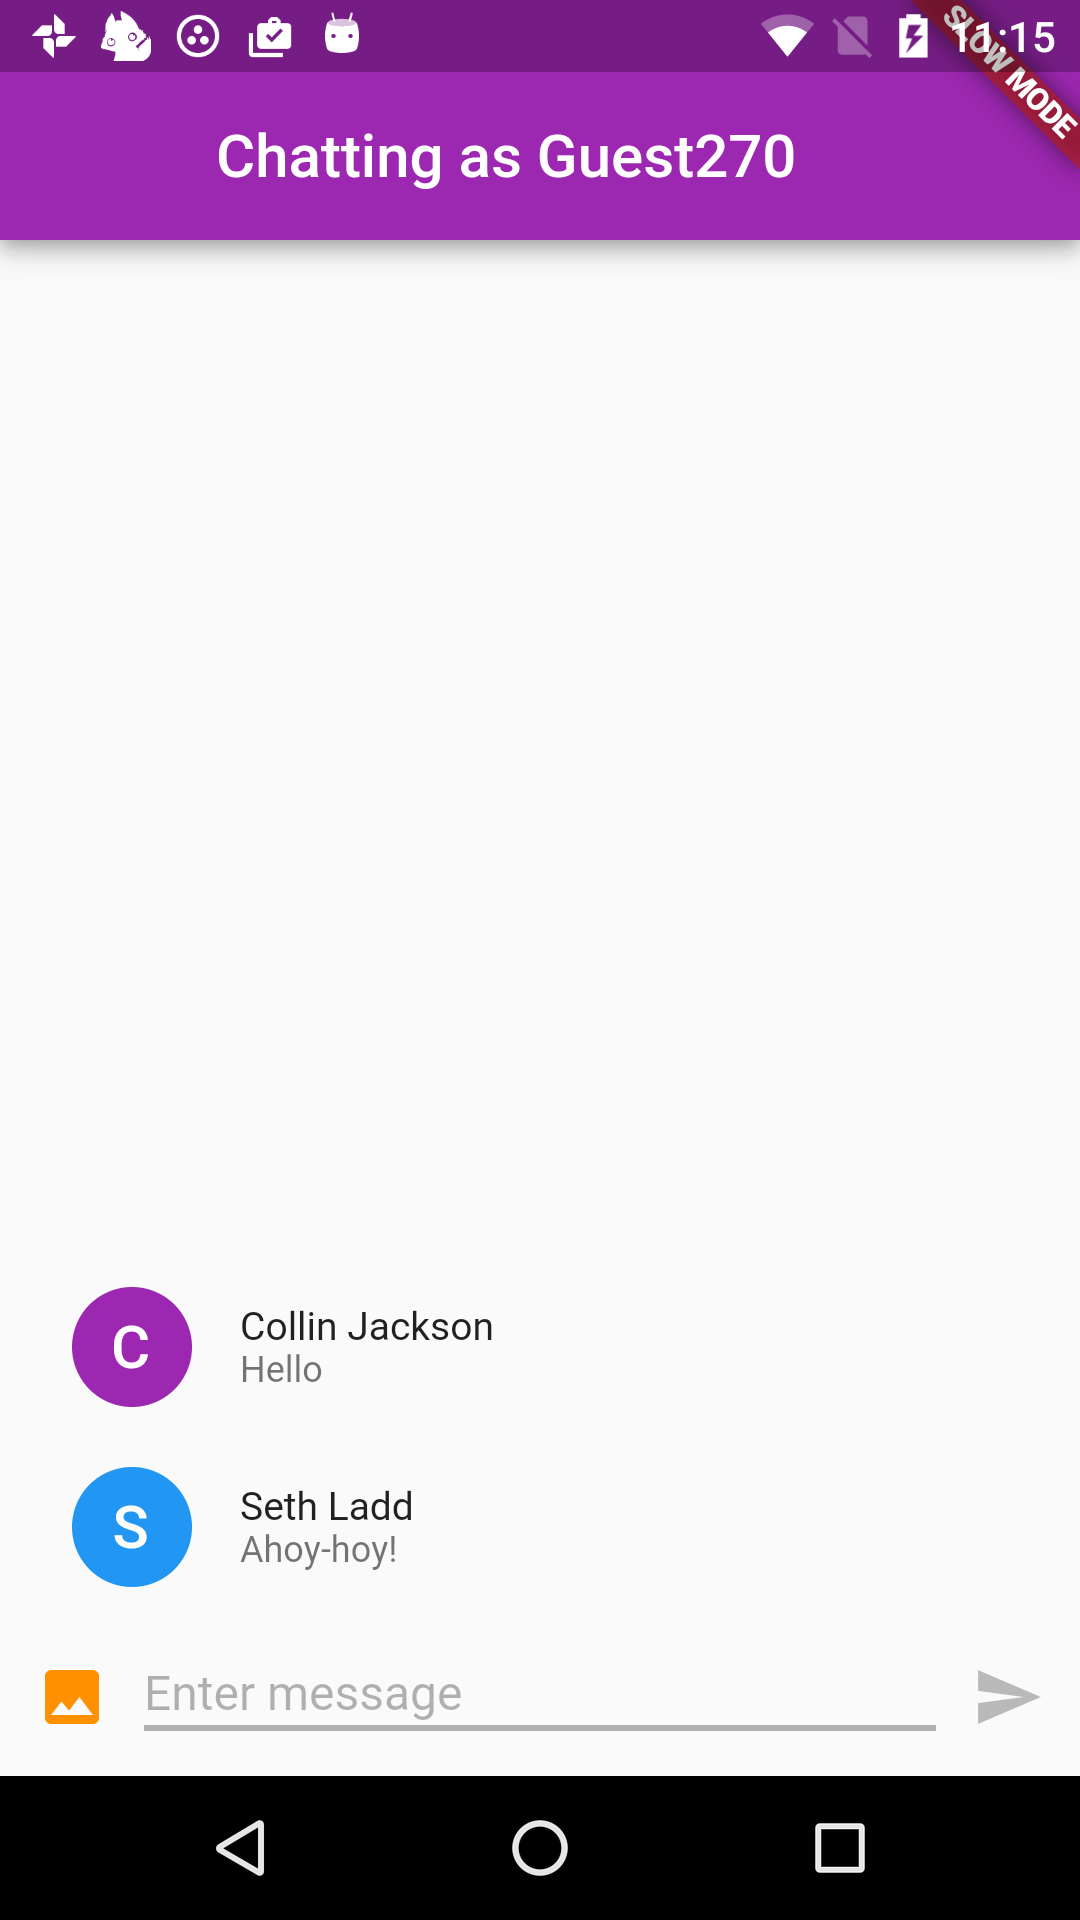
 从图中可以看出,可以实现基本的要求,如输入框,发送按钮和消息显示列表,不过还是有一个问题,就是消息列表总是显示在左边,大家都知道,聊天的时候一般是自己的消息需要显示在右边,而其他消息显示在左边,我意识到这是一需要解决的问题。不过先不管了,看看源代码再说。
这代码也是相当的简单,只有一个main.dart文件,开头和结尾就不多说了,来看看Google是怎么显示消息的。首先写了一个 ChatMessage 类,用来显示单条信息的,如下所示:
class ChatMessage extends StatelessWidget {

  ChatMessage({this.text, this.animationController, this.msgReverse});

  final String text;
  final AnimationController animationController;

  bool msgReverse;

  Widget _buildAvator(bool reverse) {

    return Container(
      margin: reverse ?  EdgeInsets.only(left: 16.0) : EdgeInsets.only(right: 16.0),
      child: CircleAvatar(child:  Text(_name[0])),
    );

  }

  Widget _buildMessage(bool reverse, BuildContext context) {

    return new Expanded(
      child: new Column(
        crossAxisAlignment: reverse ? CrossAxisAlignment.end : CrossAxisAlignment.start,
        children: <Widget>[
          new Text(_name, style: Theme.of(context).textTheme.subhead),

          new Container(
            margin: const EdgeInsets.only(top: 5.0),
            child: new Text(text),

            decoration: BoxDecoration(
              image: DecorationImage(
                image: ExactAssetImage(msgBackground),
                centerSlice: Rect.fromPoints(Offset(10.0, 11.0), Offset(10.0, 71.0)),
                fit: BoxFit.contain
                //fit: BoxFit.cover
              )
            ),
          ),

        ],
      ),
    );

  }
其中 text 即为消息内容。然后重点就是消息显示列表了,当然首先需要定义一个 List
child: new ListView.builder(
              padding: new EdgeInsets.all(8.0),
              reverse: true,
              itemBuilder: (_, int index) => _messages[index],
              itemCount: _messages.length,
            )
其中 reverse 参数表示显示方向从下往上。好了,余下的就是如何发送消息了,这个也很简单,一个输入框加上一个按钮,Google 的具体实现代码如下这个 widget 封装在了一个函数中:
Widget _buildTextComposer() {
    return new IconTheme(
      data: new IconThemeData(color: Theme.of(context).accentColor),
      child: new Container(
          margin: const EdgeInsets.symmetric(horizontal: 8.0),
          child: new Row(children: <Widget>[
            new Flexible(
              child: new TextField(
                controller: _textController,
                onChanged: (String text) {
                  setState(() {
                    _isComposing = text.length > 0;
                  });
                },
                onSubmitted: _handleSubmitted,
                decoration:
                    new InputDecoration.collapsed(hintText: "Send a message"),
              ),
            ),
            new Container(
                margin: new EdgeInsets.symmetric(horizontal: 4.0),
                child: Theme.of(context).platform == TargetPlatform.iOS
                    ? new CupertinoButton(
                        child: new Text("Send"),
                        onPressed: _isComposing
                            ? () => _handleSubmitted(_textController.text)
                            : null,
                      )
                    : new IconButton(
                        icon: new Icon(Icons.send),
                        onPressed: _isComposing
                            ? () => _handleSubmitted(_textController.text)
                            : null,
                      )),
          ]),
          decoration: Theme.of(context).platform == TargetPlatform.iOS
              ? new BoxDecoration(
                  border:
                      new Border(top: new BorderSide(color: Colors.grey[200])))
              : null),
    );
  }
在这段代码中,只需要注意输入框和按钮的相关的监听函数 _handleSubmitted(),此函数使用输入框中的文字构建一个 ChatMessage 对象,然后插入到 message List 变量的开头,再使用 setState(){} 函数更新界面,其具体代码如下:
void _handleSubmitted(String text) {
    _textController.clear();
    setState(() {
      _isComposing = false;
      msgReverse = !msgReverse;
    });
    ChatMessage message = new ChatMessage(
      text: text,
      animationController: new AnimationController(
        duration: new Duration(milliseconds: 700),
        vsync: this,
      ),
      msgReverse: msgReverse,
    );
    setState(() {
      _messages.insert(0, message);
    });
    message.animationController.forward();
  }
好了,分析到此结束,从中可以看出可以优化改进的地方还有很多,其中就是界面代码需要模块化,这样便于以后修改而不乱;再者就是要重新设计消息显示界面实现微信聊天一样的显示效果。
开始
在写代码之前,首先想一想具体的模块,如下:
- 输入框和发送按钮
- 消息显示列表
- 消息内容如何显示
其中每个消息需要显示发送时间,发送内容,消息状态和发送者的头像等,当然还包括消息显示的方向,即自己发送的在右边显示,别人的在左边显示。
首先需要设计每一个消息具体需要怎么显示,按照Google的方法,单独写一个类为 SmsMessage 继承自 StatelessWidget。其中属性如下:
final DateTime smsDate; // 消息显示时间
final String text;      // 消息内容
final bool isDeliver ;  // 判断消息显示方向
int status;             // 消息状态
其中 isDeliver 判断消息显示方向,即为 true 时显示在右边,为 false 时显示在左边。
然后需要想一想这些内容需要怎么显示,具体我也说不清楚,那就直接上最后的显示效果图:
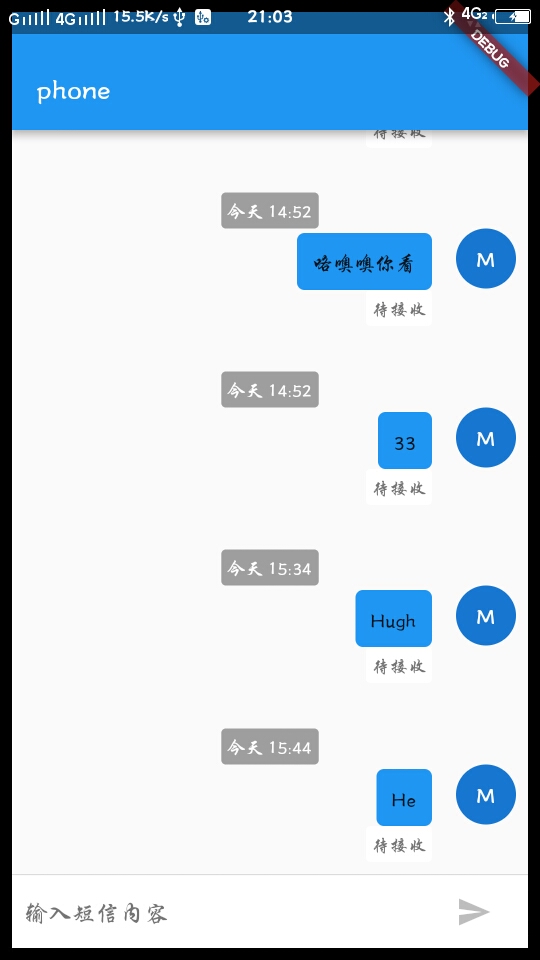
从图中可以看出,这个只有显示在右边的,因为我只是在发送没有接收,好了不多说了分析代码。因为这个不像Android有好多layout可以使用,flutter就需要自己组合了,不过一般的有三个就够了:Container、Row和Column。
首先来看一下 build 函数:
@override
  Widget build(BuildContext context) {
    // TODO: implement build
    return Container(
        margin: EdgeInsets.symmetric(vertical: 15.0),

        child: Column(

          children: <Widget>[

            _buildSMSTime(),

           Row(
            crossAxisAlignment: CrossAxisAlignment.start,
            mainAxisAlignment: isDeliver ? MainAxisAlignment.end : MainAxisAlignment.start,

            children: isDeliver ? <Widget>[

              _buildMessage(isDeliver, context),
              _buildAvator(isDeliver)

            ] : <Widget>[

              _buildAvator(isDeliver),
              _buildMessage(isDeliver, context)

            ],
          ),
          ],

        ),

      );
  }
其中的几个 _build*** 函数具体实现后面会说,在这里可以把他们看出已经实现的 widget。为了完成上面的布局效果,刚开始也是写了很多乱七八糟的代码,因为对flutter不是很熟悉,加上其布局控件目前来说很单一,也就是每个控件实现的功能都很简单需要自己组合去实现想要的布局,尝试了好久之后才组合出现在的代码。
最顶层是一个Container 然后就是一个列布局,在列布局里面有一个现实消息时间的布局加上一个行布局。在行布局中需要完成如下工作:
- 显示消息内容
- 显示头像
- 显示消息状态
- 显示消息方向,即左边还是右边
看代码分析,其中 crossAxisAlignment 参数表示行布局中子控件在垂直方向上的对其方式,我这里用的是 start 表示顶端对其,然后就是 mainAxisAlignment 参数了,这个就是水平方向的对其方式,也就是上面说的消息显示方向问题,所以这里使用 isDeliver 来确定其取值。然后下面就是 children 参数,也就是子布局,为什么这里也需要根据 isDeliver 来取值呢?你自己去实现一下就知道了,因为如果消息是显示在左边的话,就需要先显示头像然后再是消息内容,而在右边就刚好相反。好了基本布局就已经完成了,下面就是每个子 _build*** 的具体实现如下:
显示消息时控件如下:
Widget _buildSMSTime() {

    String smsTime ;

    if (smsDate.month == DateTime.now().month &&
        smsDate.day == DateTime.now().day) {

      smsTime = '今天 ';

    } else if (smsDate.month == DateTime.now().month &&
        smsDate.day == DateTime.now().day-1) {

      smsTime = '昨天 ';

    } else {
        smsTime = '${smsDate.month}-${smsDate.day} ';
    }

      if (smsDate.hour < 10) {
        smsTime += '0${smsDate.hour}:';
      } else {
        smsTime += '${smsDate.hour}:';
      }

      if (smsDate.minute < 10) {
        smsTime += '0${smsDate.minute}';
      } else {
        smsTime += '${smsDate.minute}';
      }


      return Center (
        child: Row(

          mainAxisAlignment: MainAxisAlignment.center,
          crossAxisAlignment: CrossAxisAlignment.center,
          mainAxisSize: MainAxisSize.min,

          children: <Widget>[

            Container(
              child: Padding(
                padding: EdgeInsets.all(4.0),
                child: Text(
                  smsTime,
                  style: TextStyle(
                      fontSize: 12.0,
                      color: Colors.white
                  ),
                ),
              ),

              decoration: ShapeDecoration(
                color: Colors.grey,
                shape: RoundedRectangleBorder(
                  borderRadius: BorderRadius.all(Radius.circular(3.0))
                )
              ),
            ),
          ]
        )
      );
    }
其中日期显示格式做了一些调整和修改,主要布局控件为 Center 然后再加上一个 Row 设置相关布局参数,这里的 Row 也可以不要,子控件为一个 Container 是为了设置背景色和形状,里面再带一个 Padding,设置日期字符串相对于Container上下左右的间隔。
下面是显示消息内容和消息状态的布局:
Widget _buildMessage(bool isDeliver, BuildContext context) {

    return Expanded(

      child: Column(
        crossAxisAlignment: isDeliver ? CrossAxisAlignment.end : CrossAxisAlignment.start,
        children: <Widget>[

          _buildContent(),
          _buildSMSState(),

        ],
      ),

    );

  }

  Widget _buildContent() {

    return Container(
      margin: EdgeInsets.only(top: 3.0),
      child: Container(
        margin: EdgeInsets.all(10.0),
        child: Text(text),
      ),

      decoration: ShapeDecoration(
        color: isDeliver ? Colors.blue : Colors.white,

        shape: RoundedRectangleBorder(
          borderRadius: BorderRadius.all(Radius.circular(5.0)),
        )

      )
    );

  }

  Widget _buildSMSState() {

    String smsStatus;
    Color textColor;

    if(status == 0) {

      smsStatus = smsWaiting;
      textColor = colorSecondaryText;

    } else if (status == 1) {

      smsStatus = smsReaded;
      textColor = light_blue_500;

    } else if (status == 2) {

      smsStatus = smsFailed;
      textColor = deep_orange;

    } else if (status == 3) {

      smsStatus = smsUnknow;
      textColor = deep_orange;

    }

    return Container(
      child: Padding(
        padding: EdgeInsets.all(4.0),
        child: Text(
          smsStatus,
          style: TextStyle(
              fontSize: 12.0,
              color: textColor,
          ),
        ),
      ),

      decoration: ShapeDecoration(
          color: Colors.white,
          shape: RoundedRectangleBorder(
              borderRadius: BorderRadius.all(Radius.circular(3.0))
          )
      ),
    );

  }
在消息内容控件中使用一个 Container 加再加上一个 Container,感觉有点繁琐。根据消息发送者设置了消息显示的背景。消息状态的显示也是一样的,使用 Container 加 Padding 设置了相对位置。然后就是把两者组合起来 使用 Column 控件加上 crossAxisAlignment 参数设置了对其方式。
最后就是头像的显示了,这个很简单:
Widget _buildAvator(bool isDeliver) {

    return Container(
      margin: isDeliver ?  EdgeInsets.only(left: 16.0) : EdgeInsets.only(right: 16.0),
      child: CircleAvatar(child:  Text('M')),
    );

  }
使用一个 Container 并根据发送者设置了 margin 参数。
好了,到此为止一个简单的聊天框已经设置完成,不过这仅仅是一个显示效果,什么意思呢?因为具体的数据显示还要加上网络请求相关,这就设计到数据的接受、发送和刷新了,估计布局还要做一些改动,不过大体就是这样了。初期对flutter还不是很熟悉,加上这方面的文档还是很少,不过这也有好处。就是需要一点一点的阅读官方文档,仔细了解每一个布局控件的相关属性然后就可以做到熟练应用了,这样更像是在写程序,创造东西,成就感更强烈了。
到时间了,洗澡睡觉,明天继续。
参考